Rewriting a JavaScript Classic in React: A Learning Journey
As a developer looking to dive deeper into frontend development, I decided to take on a fun and challenging project: rewriting the “Blockcode” visual programming toolkit from the book 500 Lines or Less in React. This blog post documents my journey, from understanding the original codebase to building a modern, component-based application.
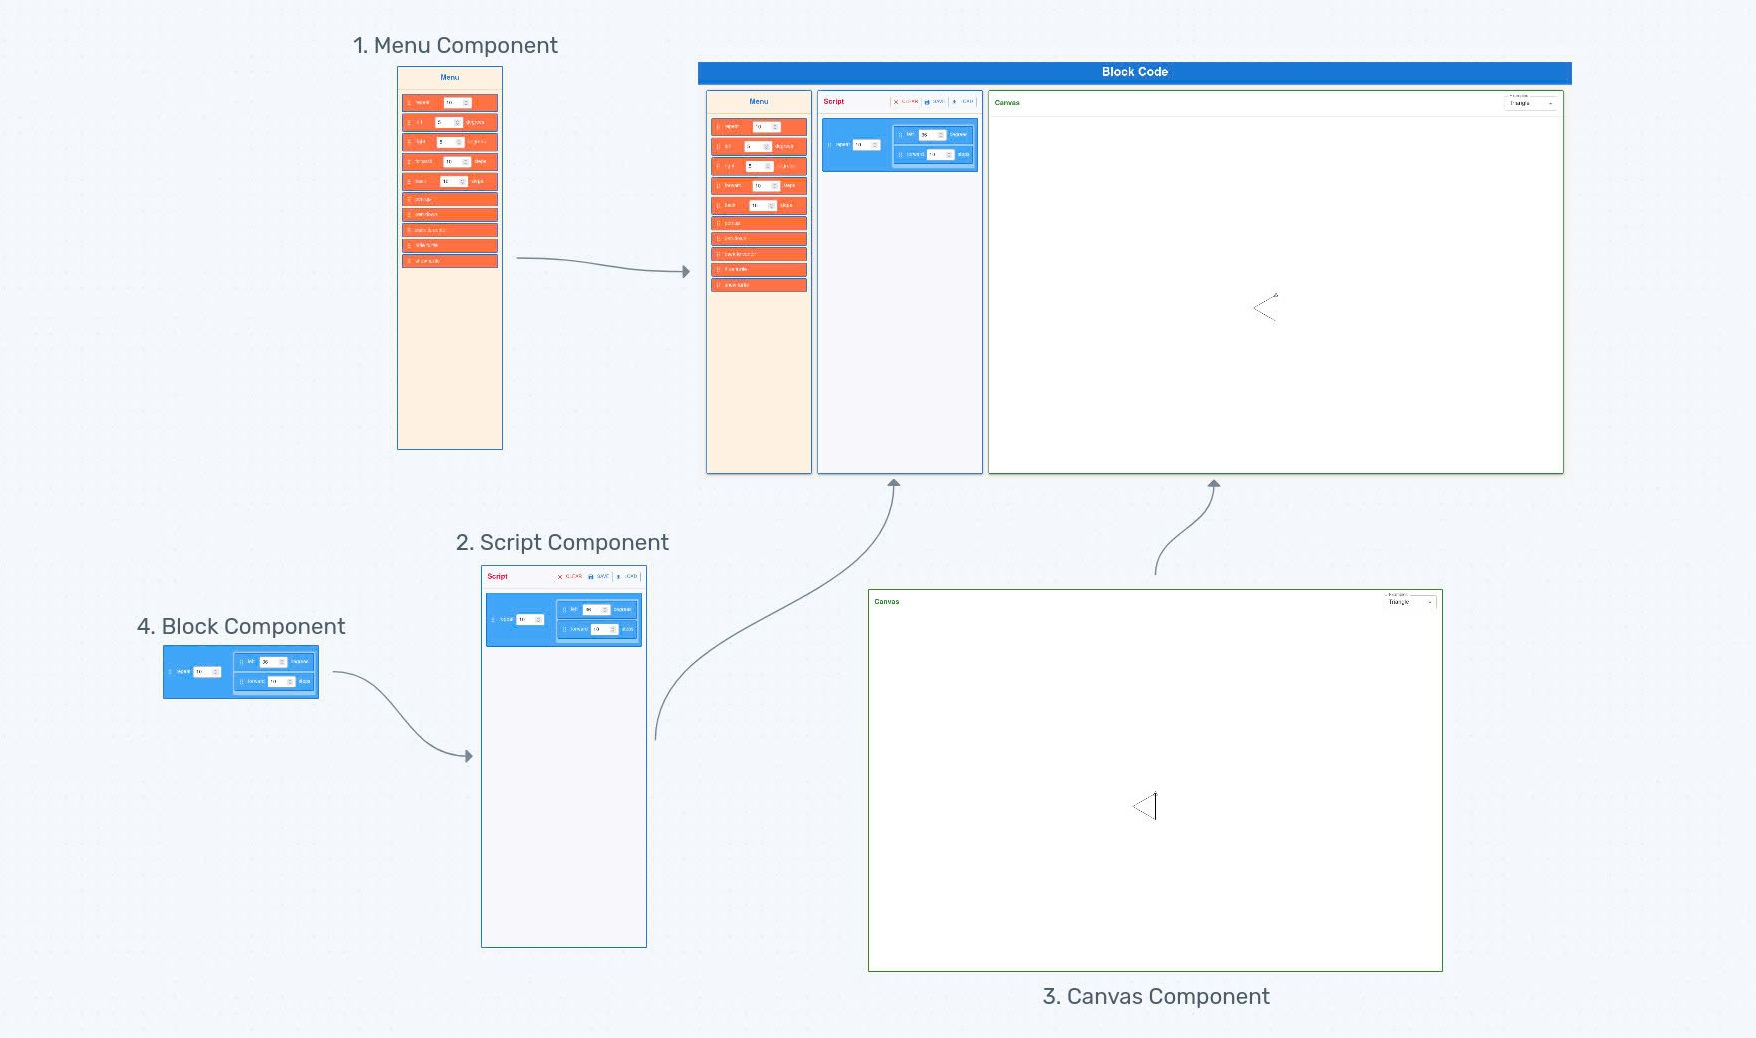
1. The Original Blockcode Project
Blockcode is a visual programming environment where users can drag and drop blocks to create scripts. These scripts can then be executed to draw shapes on a canvas. The original project, built with pure HTML, CSS, and JavaScript, is a great example of how to build a simple, interactive application without any frameworks.
The UI is divided into three columns:
- Menu: A list of available blocks that can be used to build scripts.
- Script: The area where users can drag and drop blocks to create a program.
- Canvas: The area where the output of the script is visualized.
The original implementation uses a combination of DOM manipulation and event listeners to handle the drag-and-drop functionality. The state of the application is managed through global variables and the structure of the DOM itself.
2. Why Rewrite in React?
I chose to rewrite Blockcode in React for a few reasons:
- Learning React: As a newcomer to React, I wanted a project that would allow me to explore its core concepts, such as components, state management, and hooks.
- Modernizing the Codebase: The original project, while functional, uses an older style of JavaScript. I wanted to see how I could modernize the codebase using modern JavaScript features and a component-based architecture.
- Improving Maintainability: By breaking the UI into reusable components, I hoped to create a more maintainable and scalable application.
3. The Rewrite Process: A Step-by-Step Guide
3.1. Setting Up the React Project
I started by setting up a new React project using Create React App. This provided me with a solid foundation for building the application, including a development server, a build process, and a testing framework.
3.2. Breaking the UI into Components
The first step in the rewrite was to break the UI into reusable components. At the highest level, the application is orchestrated by a main App component, which acts as the “master builder.”
App: The root component that arranges the layout, manages shared data, and orchestrates communication between the other components.Menu: Renders the list of available blocks.Script: Renders the list of blocks that make up the user’s script.Canvas: Renders the output of the script.Block: A reusable component that represents a single block.
This component-based architecture, with App at its core, makes it much easier to manage the complexity of the UI and to reason about the different parts of the application.
3.3. The App Component: The Master Builder
The App component is the central hub that brings all the other parts together. It’s responsible for:
- Layout: Arranging the
Menu,Script, andCanvascomponents on the screen. - Shared Data: Managing the
scriptBlocks—the list of blocks in the Script Area—which is the single source of truth for the application’s state. - Communication: Passing down functions to the child components to handle interactions like drag-and-drop.
Here’s a simplified look at how the App.js component is structured:
// src/App.js (simplified)
import React from 'react';
import { Grid, Container } from '@mui/material';
import Menu from './components/Menu';
import Script from './components/Script';
import Canvas from './components/Canvas';
import useDragAndDrop from './hooks/useDragAndDrop';

function App() {
  const {
    scriptBlocks,
    setScriptBlocks,
    handleDragStart,
    handleDrop,
    clearScript,
  } = useDragAndDrop();

  return (
    <Container maxWidth={false}>
      <Grid container spacing={2}>
        <Grid item xs={12} md={3}>
          <Menu onDragStart={handleDragStart} />
        </Grid>
        <Grid item xs={12} md={3}>
          <Script
            blocks={scriptBlocks}
            setBlocks={setScriptBlocks}
            onDrop={handleDrop}
            onClear={clearScript}
          />
        </Grid>
        <Grid item xs={12} md>
          <Canvas blocks={scriptBlocks} setBlocks={setScriptBlocks} />
        </Grid>
      </Grid>
    </Container>
  );
}

export default App;
As you can see, the App component uses the useDragAndDrop hook to manage the state of the scriptBlocks and the drag-and-drop functionality. It then passes this state and the handler functions down to the Menu, Script, and Canvas components as props. This ensures that all components are synchronized and that the data flows in a single, predictable direction.
3.4. A Closer Look at the Block Component
The Block component is the heart of our visual programming interface. It’s the reusable piece of UI that represents a single instruction in our script. To understand how it works, we need to look at two key parts: the block definition and the React component that brings it to life.
3.4.1. Block Definition
Think of a block definition as a blueprint. It’s a plain JavaScript object that describes everything a block can do. These definitions tell our application what to render and how the block should behave. All the block definitions are stored in a central file.
Here’s a simplified example of what a block definition looks like:
// src/blocks.js
const BLOCKS = [
    { name: 'forward', value: 10, contents: 'steps' }, // A block to move forward
    { name: 'left', value: 5, contents: 'degrees' },   // A block to turn left
    { name: 'repeat', value: 10, contents: [] },      // A block that can contain others
    { name: 'pen up' },                               // A simple action block
];
name: The text displayed on the block (e.g., “forward”).value: If a block needs a number input (like “move forward 10 steps”), it will have avalueproperty.contents: This tells us what the block “contains.” If it’s an empty array ([]), it means this block is a “container” that can hold other blocks inside it (like ourrepeatblock).
3.4.2. The React Component
The Block React component takes a block definition and turns it into a visual element that you can see and interact with. It displays the block’s name, provides an input field for its value, and handles the visual styling.
Here’s a simplified version of the Block.js component:
// src/components/Block.js (Simplified)
import React from 'react';
import { Typography, TextField, Box } from '@mui/material';
import { styled } from '@mui/material/styles';

// This creates the visual container for our block (its shape, color, etc.)
const BlockContainer = styled(Box)(({ theme }) => ({
  backgroundColor: '#ff7043', // Orange color for menu blocks
  padding: theme.spacing(1),
  margin: theme.spacing(0.5),
  display: 'flex',
  alignItems: 'center',
}));

const Block = ({ block }) => { // The 'block' prop receives a definition from src/blocks.js
  return (
    <BlockContainer>
      {/* 1. Display the block's name */}
      <Typography variant="body2">{block.name}</Typography>

      {/* 2. If block.value is defined, show a number input field */}
      {block.value !== undefined && (
        <TextField
          type="number"
          value={block.value}
          // ... code for handling value changes
        />
      )}

      {/* 3. If block.contents is an array, it means this block can hold other blocks */}
      {Array.isArray(block.contents) && (
        <Box sx=>
          {/* This is where other Block components would be rendered inside */}
          {/* (e.g., the blocks inside a 'repeat' loop) */}
        </Box>
      )}
    </BlockContainer>
  );
};
This flow diagram illustrates how the block definitions and components work together:
sequenceDiagram
    participant App
    participant BlockDefinitions as Block Definitions
    participant BlockComponent as Block Component

    App->>BlockDefinitions: "Give me all the block types."
    BlockDefinitions-->>App: Provides a list of block definitions
    Note over App: App iterates through each definition
    App->>BlockComponent: "Draw this block for me!"
    BlockComponent-->>App: Displays a visual, interactive block
3.5. The Menu: Your Block Library
Now that we have our Block component, we need a place to display all the available blocks. This is where the Menu component comes in. The Menu component is responsible for rendering a list of all the available blocks that users can drag and drop into the script area.
In the original Blockcode, the menu was a simple list of predefined blocks. In our React version, we can make it more dynamic. The Menu component fetches the list of block definitions (from src/blocks.js) and uses the Block component to render each one.
Here’s a simplified look at the Menu.js component:
// src/components/Menu.js (simplified)
import React from 'react';
import { Paper, Typography, Box } from '@mui/material';
import BLOCKS from '../blocks'; // Getting our block definitions
import Block from './Block'; // The Block component

const Menu = ({ onDragStart }) => {
  return (
    <Paper elevation={3}>
      <Typography variant="h6">Menu</Typography>
      <Box>
        {BLOCKS.map((block) => (
          <Block
            key={block.name}
            block={block}
            onDragStart={(e) => onDragStart(e, block, 'menu')}
            variant="menu"
          />
        ))}
      </Box>
    </Paper>
  );
};

export default Menu;
This component maps over the BLOCKS array and renders a Block for each definition. The onDragStart prop is crucial for enabling the drag-and-drop functionality, which we’ll discuss later.
3.6. The Script Area: Assembling Your Program
Once you have a library of blocks in the Menu, you need a place to assemble them into a program. That’s the role of the Script Area. It’s the main workspace where you drag blocks from the Menu and drop them to create a sequence of commands. Blocks snap together vertically, and you can even nest blocks inside special “container” blocks like repeat.
The Script Area also includes controls to clear the workspace, and eventually, to save and load scripts.
3.6.1. The Script Component
This entire workspace is managed by our Script component. It’s responsible for:
- Maintaining the list of blocks that make up the current program.
- Rendering the blocks in the correct order.
- Handling drag-and-drop events to add new blocks or reorder existing ones.
- Providing controls like “Clear”, “Save”, and “Load”.
Here’s a simplified version of the Script.js component:
// src/components/Script.js (simplified)
import React from 'react';
import { Paper, Typography, Box, ButtonGroup, Button } from '@mui/material';
import Block from './Block';

const Script = ({ blocks, setBlocks, onClear /* and other props */ }) => {
  return (
    <Paper>
      <Box>
        <Typography variant="h6">Script</Typography>
        <ButtonGroup size="small">
          <Button onClick={onClear}>Clear</Button>
          <Button>Save</Button>
          <Button>Load</Button>
        </ButtonGroup>
      </Box>
      <Box>
        {blocks && blocks.length > 0 ? (
          blocks.map((block) => (
            <Block
              key={block.id}
              block={block}
              // ... other props for drag/drop and value updates
            />
          ))
        ) : (
          <Typography variant="body2">
            Drag blocks here to build your script
          </Typography>
        )}
      </Box>
    </Paper>
  );
};

export default Script;
The Script component receives the list of blocks as a prop and maps over it, rendering a Block component for each item in the list. When a block is dropped onto the Script Area, the list of blocks is updated, and React re-renders the component to show the new state of the script.
3.7. The Canvas and the Turtle: Making it Draw
The final piece of the UI is the Canvas component. This is where the magic happens! The Canvas is a drawing board where a virtual “turtle” executes the commands from the Script Area and draws shapes. It provides immediate visual feedback, allowing users to see the results of their code in real-time.
But how do the blocks in the Script Area translate into lines on the screen? This is where I implemented a Turtle Graphics Engine.
The concept is a classic. I created a virtual “turtle” (our artist) that lives on the HTML <canvas> element (our drawing board). The Canvas React component is responsible for managing this process, while a separate Turtle class handles the actual drawing logic.
Here’s how it works from a high level when a user changes their script:
sequenceDiagram
    participant ScriptArea as Script Area
    participant App
    participant CanvasComponent as Canvas Component
    participant TurtleEngine as Turtle Graphics Engine

    ScriptArea->>App: User adds/changes blocks
    App->>CanvasComponent: "Here are the new blocks to run!"
    CanvasComponent->>TurtleEngine: "Clear and reset"
    CanvasComponent->>TurtleEngine: "Execute commands (forward, right, etc.)"
    TurtleEngine-->>CanvasComponent: Draws shapes on the canvas
3.7.1. The Canvas Component: The Interpreter
The Canvas component orchestrates the entire drawing process. It uses a useEffect hook that watches for any changes to the blocks prop. Whenever the script is updated, the effect runs, telling the Turtle to clear the canvas and redraw the entire script from the beginning.
The most important part of this component is the runBlocks function, which I designed to act as an interpreter. It iterates through each block in the script and calls the corresponding method on the Turtle object. For container blocks like repeat, it recursively calls itself to execute the nested blocks.
Here’s a simplified look at the implementation:
// src/components/Canvas.js (Simplified)
import React, { useRef, useEffect, useCallback } from 'react';
import Turtle from '../turtle'; // Our Turtle Graphics Engine

const Canvas = ({ blocks }) => {
  const canvasRef = useRef(null);
  const turtleRef = useRef(null); // This will hold our Turtle object

  // This function interprets the blocks and tells the turtle what to do
  const runBlocks = useCallback((blocksToRun) => {
    const turtle = turtleRef.current;
    const execute = (currentBlocks) => {
      currentBlocks.forEach(block => {
        switch (block.name) {
          case 'forward':
            turtle.forward(block.value);
            break;
          case 'left':
            turtle.left(block.value);
            break;
          case 'repeat':
            for (let i = 0; i < block.value; i++) {
              execute(block.contents); // Recursively run blocks inside repeat
            }
            break;
          case 'pen up':
            turtle.penUp();
            break;
          // ... other block types
        }
      });
    };

    turtle.clear(); // Clear before drawing
    execute(blocksToRun); // Start executing
    turtle.drawTurtle(); // Draw the turtle's icon
  }, []);

  useEffect(() => {
    const canvas = canvasRef.current;
    // Create a new turtle instance when the component mounts
    if (!turtleRef.current) {
        turtleRef.current = new Turtle(canvas);
    }
    runBlocks(blocks); // Re-run the script to draw everything
  }, [blocks, runBlocks]);

  return <canvas ref={canvasRef} width="400" height="400" />;
};
3.7.2. The Turtle Class: The Artist
The Turtle class (src/turtle.js) encapsulates all the low-level drawing logic. It doesn’t know anything about React or blocks; it just knows how to draw on a canvas. It tracks its own state:
- Position: Its
xandycoordinates. - Direction: The angle it’s facing.
- Pen State: Whether the pen is up (moving) or down (drawing).
When the Canvas component calls methods like turtle.forward(50), the Turtle class uses the HTML Canvas 2D drawing context (ctx) to perform the action.
Here’s a simplified version of the Turtle class:
// src/turtle.js (Simplified)
class Turtle {
  constructor(canvas) {
    this.ctx = canvas.getContext('2d');
    this.reset();
  }

  reset() {
    // Start in the center, facing up
    this.position = { x: this.canvas.width / 2, y: this.canvas.height / 2 };
    this.direction = this.deg2rad(90);
    this.pen = true; // Pen is down by default
  }

  deg2rad(degrees) {
    return (Math.PI / 180) * degrees;
  }

  forward(distance) {
    const start = this.position;
    // Calculate new position using trigonometry
    this.position = {
      x: Math.cos(this.direction) * distance + start.x,
      y: -Math.sin(this.direction) * distance + start.y, // Y-axis is inverted
    };

    if (this.pen) {
      this.ctx.beginPath();
      this.ctx.moveTo(start.x, start.y);
      this.ctx.lineTo(this.position.x, this.position.y);
      this.ctx.stroke();
    }
  }

  left(degrees) {
    this.direction += this.deg2rad(degrees);
  }

  right(degrees) {
    this.direction -= this.deg2rad(degrees);
  }

  penUp() { this.pen = false; }
  penDown() { this.pen = true; }

  clear() {
    this.ctx.clearRect(0, 0, this.canvas.width, this.canvas.height);
    this.reset();
  }
  // ... other methods
}
This separation of concerns was a key goal of the rewrite. The Canvas component handles the “what” (interpreting the script), while the Turtle class handles the “how” (the actual drawing). This makes the system much cleaner and easier to debug than the original’s monolithic structure.
The final piece of our UI is the Canvas component. This is where the magic happens! The Canvas is a drawing board where a virtual “turtle” executes the commands from the Script Area and draws shapes. It provides immediate visual feedback, allowing users to see the results of their code in real-time.
The Canvas component also includes a dropdown menu with pre-built examples, like drawing a triangle or a flower. This is a great way for users to explore what’s possible and learn how to create complex drawings.
sequenceDiagram
    participant ScriptArea as Script Area
    participant App
    participant CanvasComponent as Canvas Component
    participant TurtleEngine as Turtle Graphics Engine

    ScriptArea->>App: User adds/changes blocks
    App->>CanvasComponent: "Here are the new blocks to run!"
    CanvasComponent->>TurtleEngine: "Clear and reset"
    CanvasComponent->>TurtleEngine: "Execute commands (forward, right, etc.)"
    TurtleEngine-->>CanvasComponent: Draws shapes on the canvas
3.7.3. The Canvas Component and the Turtle Engine
The Canvas component uses the HTML <canvas> element to create the drawing surface. It holds a reference to this element using useRef. The core logic resides in a useEffect hook that runs whenever the blocks in the script change.
This useEffect hook does two things:
- It clears the canvas.
- It iterates through the blocks and uses a Turtle Graphics Engine to execute each command.
The Turtle engine (turtle.js) is a simple class that knows how to draw on the canvas. It keeps track of the turtle’s position and direction and provides methods like forward(), right(), penUp(), and penDown().
Here’s a highly simplified look at how they work together:
// src/components/Canvas.js (Simplified)
import React, { useRef, useEffect } from 'react';
import Turtle from '../turtle'; // Our Turtle Graphics Engine

const Canvas = ({ blocks }) => {
  const canvasRef = useRef(null);
  const turtleRef = useRef(null);

  useEffect(() => {
    const canvas = canvasRef.current;
    // Create a new turtle instance if one doesn't exist
    if (!turtleRef.current) {
      turtleRef.current = new Turtle(canvas);
    }
    const turtle = turtleRef.current;

    // Clear the canvas and run the blocks
    turtle.clear();
    runBlocks(blocks, turtle);
    turtle.drawTurtle();

  }, [blocks]); // Re-run whenever the blocks change

  const runBlocks = (blocksToRun, turtle) => {
    blocksToRun.forEach(block => {
      switch (block.name) {
        case 'forward': turtle.forward(block.value); break;
        case 'right': turtle.right(block.value); break;
        // ... and so on for other commands
      }
    });
  };

  return <canvas ref={canvasRef} />;
};
// src/turtle.js (Simplified)
class Turtle {
  constructor(canvas) {
    this.ctx = canvas.getContext('2d');
    this.reset();
  }

  reset() {
    this.position = { x: 150, y: 150 }; // Center
    this.direction = 90; // Facing up
    this.pen = true; // Drawing by default
  }

  forward(distance) {
    // ... math to calculate new position
    if (this.pen) {
      this.ctx.beginPath();
      this.ctx.moveTo(this.position.x, this.position.y);
      // ... update position
      this.ctx.lineTo(this.position.x, this.position.y);
      this.ctx.stroke();
    }
  }

  right(degrees) {
    this.direction -= degrees;
  }
  // ... other methods
}
Together, the Canvas component orchestrates the drawing process, while the Turtle class handles the low-level drawing commands.
3.8. Managing State and Implementing Drag-and-Drop
One of the most critical aspects of the rewrite was handling the application’s state and the complex interactions of drag-and-drop. In the original project, this was done with global variables and direct DOM manipulation. In React, I could create a much more robust and maintainable system.
The core idea is unidirectional data flow. The main App component holds the application’s state—specifically, the list of blocks in the script—and passes it down to child components through props. When a change occurs (like dropping a block), the state is updated in the App component, and React efficiently re-renders the necessary parts of the UI.
To handle the drag-and-drop logic, I created a custom hook, useDragAndDrop. This hook is the “brain” of the operation, centralizing all the logic for moving blocks around. It’s the “invisible hand” that lets you:
- Pick up a
forwardblock from the “Menu”. - Drag it over to the “Script” area.
- Drop it into place, adding it to your program.
- Rearrange blocks already in your “Script”.
- Even “delete” a block by dragging it back to the “Menu” area.
3.8.1. The useDragAndDrop Hook
The App component calls this hook to get the state and the handler functions, which it then passes down to the Menu and Script components.
// src/App.js (Simplified)
import useDragAndDrop from './hooks/useDragAndDrop'; // Our special hook

function App() {
  const {
    scriptBlocks, // The list of blocks currently in our program
    setScriptBlocks, // Function to update the program blocks
    handleDragStart, // Function for when a drag begins
    handleDragEnter, // Function for when a block enters a drag-sensitive area
    handleDragLeave, // Function for when a block leaves a drag-sensitive area
    handleDragOver,  // Function for when a block is dragged over an area
    handleDrop,      // Function for when a block is dropped
    // ... other functions
  } = useDragAndDrop();

  return (
    // ... layout setup
    <Menu
      onDragStart={handleDragStart} // Pass the drag start function to Menu
      onDragEnter={handleDragEnter}
      onDragLeave={handleDragLeave}
      onDragOver={handleDragOver}
      onDrop={handleDrop}         // Pass the drop function to Menu
    />
    <Script
      blocks={scriptBlocks}       // Pass the current program blocks
      setBlocks={setScriptBlocks} // Allow Script to update blocks
      onDragStart={handleDragStart} // Pass drag functions to Script too
      onDragEnter={handleDragEnter}
      onDragLeave={handleDragLeave}
      onDragOver={handleDragOver}
      onDrop={handleDrop}         // Pass drop function to Script
      // ... other props
    />
    // ... other components
  );
}
This setup decouples the components. The Menu and Script components don’t need to know the implementation details of the drag-and-drop logic; they just need to call the functions passed to them as props.
3.8.2. What Happens Under the Hood?
Let’s trace the journey of a block from the Menu to the Script.
sequenceDiagram
    participant User
    participant BlockComp as Block Component (Menu)
    participant MenuComp as Menu Component
    participant ScriptComp as Script Component
    participant DragDropHook as useDragAndDrop Hook

    User->>BlockComp: Starts dragging "forward" block
    BlockComp->>DragDropHook: Calls handleDragStart(event, forwardBlock, 'menu')
    DragDropHook->>DragDropHook: Stores 'forwardBlock' as dragTarget, 'menu' as dragType
    Note over User: User drags "forward" block over Script area
    ScriptComp->>DragDropHook: Calls handleDragEnter(event) & handleDragOver(event)
    ScriptComp->>ScriptComp: Changes visual style (e.g., highlights border)
    User->>ScriptComp: Drops "forward" block
    ScriptComp->>DragDropHook: Calls handleDrop(event, 'script', null)
    DragDropHook->>DragDropHook: Sees dragType is 'menu', dropZoneType is 'script'
    DragDropHook->>DragDropHook: Creates a NEW 'forward' block with a unique ID
    DragDropHook->>DragDropHook: Adds new block to scriptBlocks
    DragDropHook-->>ScriptComp: scriptBlocks state is updated
    ScriptComp->>ScriptComp: Rerenders to show new "forward" block
The useDragAndDrop hook manages this entire process. Here are its key functions:
1. Remembering the Dragged Block (handleDragStart)
When you begin dragging a block, handleDragStart is called. Its job is to remember which block is being dragged and where it came from.
// src/hooks/useDragAndDrop.js (handleDragStart)
const handleDragStart = (e, block, type) => {
  e.stopPropagation(); // Stop other elements from reacting
  setDragTarget(block); // We remember the actual block object
  setDragType(type);   // We remember if it's from the menu or script
  e.dataTransfer.effectAllowed = type === 'menu' ? 'copy' : 'move';
};
setDragTarget(block): This saves the block object you picked up into thedragTargetstate variable.setDragType(type): This tells the hook if the block originated from the'menu'(in which case we’ll make a copy when it’s dropped) or from the'script'(in which case we’ll move it).
2. Handling the Drop (handleDrop)
This is the core logic. Once you release the mouse button, handleDrop is called. It uses the dragTarget (the block being dragged) and the dropZoneType (where it was dropped) to update the scriptBlocks state.
// src/hooks/useDragAndDrop.js (handleDrop)
const handleDrop = (e, dropZoneType, dropTarget) => {
  e.preventDefault();
  e.stopPropagation();

  let newScriptBlocks = [...scriptBlocks]; // Create a working copy of our blocks

  if (dragType === 'menu') {
    // Scenario 1: Dragging a block FROM THE MENU
    const newBlock = {
      ...dragTarget, // Copy all properties from the original menu block
      id: new Date().getTime(), // IMPORTANT: Give it a unique ID for the script
      contents: Array.isArray(dragTarget.contents) ? [] : dragTarget.contents, // Reset contents if it's a container
    };

    if (dropZoneType === 'script') {
      newScriptBlocks.push(newBlock); // Add the new block to the end of the script
    } else if (dropZoneType === 'block') {
      // Find the block we dropped onto (the dropTarget)
      const targetBlock = findBlock(newScriptBlocks, dropTarget.id);
      if (targetBlock && Array.isArray(targetBlock.contents)) {
        // If it's a container block (like 'repeat'), add the new block inside it
        targetBlock.contents.push(newBlock);
      } else if (targetBlock) {
        // If it's a regular block, insert the new block right after it
        const containingArray = findContainingArray(newScriptBlocks, dropTarget.id);
        const index = containingArray.findIndex(b => b.id === dropTarget.id);
        containingArray.splice(index + 1, 0, newBlock); // Insert after target
      }
    }
  } else if (dragType === 'script') {
    // Scenario 2: Dragging a block FROM THE SCRIPT (moving or deleting)
    const draggedBlock = findBlock(newScriptBlocks, dragTarget.id); // Get the actual block being moved

    // First, remove the block from its original position
    const containingArray = findContainingArray(newScriptBlocks, dragTarget.id);
    const index = containingArray.findIndex(b => b.id === dragTarget.id);
    containingArray.splice(index, 1); // Remove it from where it was

    if (dropZoneType === 'script') {
      newScriptBlocks.push(draggedBlock); // Add it to the end of the main script
    } else if (dropZoneType === 'block') {
      // Move it into or next to another block
      const targetBlock = findBlock(newScriptBlocks, dropTarget.id);
      if (targetBlock && Array.isArray(targetBlock.contents)) {
        targetBlock.contents.push(draggedBlock); // Move into a container
      } else if (targetBlock) {
        const targetContainingArray = findContainingArray(newScriptBlocks, dropTarget.id);
        const targetIndex = targetContainingArray.findIndex(b => b.id === dropTarget.id);
        targetContainingArray.splice(targetIndex + 1, 0, draggedBlock); // Insert after target
      }
    } else if (dropZoneType === 'menu') {
      // Dropped back onto the Menu area: This means delete the block!
      // (It's already removed by the splice above, so no further action needed here)
    }
  }

  setScriptBlocks(newScriptBlocks); // Update our program's blocks, triggering a re-render!
  setDragTarget(null); // Clear the dragged block info
  setDragType(null);   // Clear the drag type info
};
The logic here handles all cases: adding a new block from the menu, moving a block within the script, nesting blocks, and deleting blocks by dragging them back to the menu. After the scriptBlocks array is modified, setScriptBlocks(newScriptBlocks) is called. This updates the state, causing React to re-render the Script component and display the program in its new configuration. This approach keeps the drag-and-drop logic separate from the components, making the code more modular and easier to maintain.
4. Challenges Faced
Every project has its hurdles, and this one was no exception. The biggest challenge was, without a doubt, the drag-and-drop system. Implementing it in a way that felt intuitive and handled all the edge cases—like nesting blocks, reordering them, and deleting them—required careful state management.
Aligning this with React’s unidirectional data flow was a puzzle. I had to ensure that the state, which was managed in the main App component, was updated correctly no matter where the user dragged a block. This led me to create the useDragAndDrop hook, which centralized the logic and kept the components clean. It was a fantastic learning experience in building complex, interactive UIs in React.
5. Comparing the Old and New
The rewrite was a success, and the comparison between the two implementations highlights the benefits of using a modern framework like React.
| Original Implementation | React Implementation | |
|---|---|---|
| Architecture | Monolithic | Component-based |
| Maintainability | Difficult to maintain | Easy to maintain |
| User Experience | Good | Good |
| Performance | Good | Good |
| Developer Experience | Difficult | Good |
The component-based architecture makes the new version far more maintainable. Each piece of the UI is a self-contained unit, making it easier to understand, test, and modify. While the user experience is similar, the developer experience is worlds apart.
6. What I Learned
This project was an incredible learning journey. It solidified my understanding of core React concepts and taught me how to approach building a modern web application. My key takeaways include:
- Component-Based Architecture: I learned how to break down a complex UI into small, reusable components, which is the cornerstone of React development.
- State Management: I gained hands-on experience with managing application state using hooks and props, ensuring a predictable and maintainable data flow.
- Custom Hooks: I discovered the power of custom hooks for encapsulating and reusing complex logic, as I did with the
useDragAndDrophook. - Modern JavaScript: I was able to apply modern JavaScript features (ES6+) to write cleaner and more concise code.
7. Future Plans
While the rewrite is complete, there are always more features to add. Here are a few ideas I’m considering for the future:
- More Block Types: I’d like to expand the block library to include loops, conditionals, and variables, allowing for more complex programs.
- UI Enhancements: A visual refresh, including a dark mode and more polished block designs, would improve the user experience.
- Backend Integration: Adding a backend would allow users to save their scripts to an account and share them with others.
8. Source Code
The complete source code for this project is available on GitHub. Feel free to explore the code, open issues, and contribute if you’re interested.
9. Conclusion
Rewriting the Blockcode project in React was a rewarding experience. It was a practical way to learn the framework and a fun project to work on. If you’re new to React, I highly recommend taking on a similar project. Find something you’re passionate about, break it down into small pieces, and start building. You’ll be amazed at how much you learn along the way.